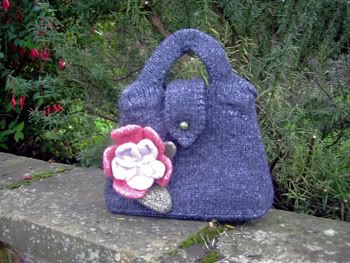
This bag was designed to be both practical and pretty. The knit in handles sit more comfortably in the hand than the standard button hole bag, while the strap helps to keep your belongings safe inside. The folded side panels allow the bag to maintain its strong lines, while being able to expand to fit in all your essentials.
Materials
200g Rowan Soft Tweed in "Blanket" (Shade 008)
8mm (US 11) Circular Needle
4 stitch markers,
Contrasting waste thread.
Button.
Tension
12 sts x 16 Rows = 10 cm x 10 cm measured over St St BEFORE felting. After felting my tension square measured 7cm x 7 cm
Base
The base is worked flat. Work in rows backwards and forwards
Cast on 43 sts.
Work 36 rows Garter St
Main Section
Place marker at start of row. It helps if this one is noticably different to the other ones you are using, as it will mark the begining of each round.
Knit across 43 sts on needle. Place second marker.
Pick up and knit 18 sts along row end. Place third marker.
Pick up and knit 43 sts along cast on edge. Place fourth marker.
Pick up and knit 18 sts along row end. 126 sts in total.
You will have four markers in place, indicating each corner point of the bag. The main section of the bag is worked in the round.
Pattern Note: The total stitch count for the round is given at the end of each decrease row, the numbers in italics indicate how many stitches are between each marker.
1/ *SSK, K 39 K2tog. K18 * ** repeat to end of round (122) 39:18:39:18
Work 8 rows st st.
10/*SSK, K 37 K2tog. K18 * ** repeat to end of round (118) 37:18:37:18
Work 8 rows st st.
19/*SSK, K 35 K2tog. K18 * ** repeat to end of round (114) 35:18:35:18
Work 8 rows st st.
28/*SSK, K 33 K2tog. K18 * ** repeat to end of round (110) 33:18:33:18
Work 8 rows st st.
37/*SSK, K 31,K2tog. K18 * ** repeat to end of round (106) 31:18:31:18
Work 8 rows st st.
46/*SSK, K 29,K2tog. K18 * ** repeat to end of round (102) 29:18:29:18
Work 8 rows st st.
55/*SSK, K 27,K2tog. K18 * ** repeat to end of round (102) 29:18:29:18
Cast off for handles:
When instructed to cast off a number of stitches, begin by working a K st and then passing this over the next st, as you would usually do at the start of a cast off row. Do not begin by passing the last stitch worked over.
K8, cast off 13( 1 st on Right Hand Needle), K7 , Cast off 18 (1 St on Right Hand Needle)K7, cast off 13 (1 st on RH needle) K7, Cast off 18 (1 st on RH needle) DO NOT BREAK YARN
The Handles
Each handle is worked seperately. After casting off you will have 4 groups of 8 sts. The first stitch of the first group will already have been worked and is on the right hand needle. Each group of stitches forms a base point of the handle.
For this section work back and forward in rows NOT rounds. The yarn is attached ready to work the front handle, continue as follows:
Front handle.
1/K across remaining 7 sts. Place marking thread. Cast on 23. Place marking thread K8 (39)
2/P
3/K1,M1 K to last st, M1,K1
4/P
Repeat rows 3 and 4, a further three times. (47)
9/ SSK, K to last 2 sts, K2tog
10/P
Repeat rows 9 and 10, three times more. (39)
Cast off 5. Place Marker. Cast off 29 Place Marker. Cast off remaining 5 sts.
Back handle.
With RS facing rejoin yarn to the first group of 8 sts. Knit the first stitch.
Work back handle to match front, starting with row one of the handle pattern.
Making up the handles
Fold handles in half lengthways, so that the marking threads match up at each end of the inside seam of the handle. The remaining cast on stitches will extend about 2.5cm inside of the bag. This gives the handle extra stability.
Pin in place and secure seam by overcasting. For illustration purposes only I have worked a running stitch in red thread to help indicate where the seam should lie.
Illustration of how to join handles
The strap
Cast on 12 sts.
1/K
2/K2, P to last 2 sts, K2
repeat until the strap measures 30 cm from beg
Continue as follows:
1/ SKP, K to last 2 sts K2tog, (10)
2/ K2, P to last 2 sts K2
3/ SKP, K1 K2TOG, YRN twice SKP, K1,K2tog
4/ K2, P2, (K1,P1) in to yrn of previous row, P2, K2
Decrease 1 st at each end of next and every foll alt row until 2 sts remain
Next row: P2tog (1)
Fasten off.
Sew the strap in place joining the cast on row to the centre back of the bag, directly between the handles.
Felting & Blocking
Before felting weave in and trim any loose ends.
Soft Tweed felts very easily. I only needed to put the bag through one washing machine cycle at 40 degrees to achieve the desired amount of felting. I added only a few of heavy laundry items( one pair of jeans and couple of towels)to provide some agitation. To begin I would advise that you do the same. If you are not happy with the amount of felting achieved repeat the process until you have your desired result.
Before blocking the bag, remove as much moisture from the work as possible by pressing and rolling it in a thick towel. Next, lay it out flat on a clean and dry towel and mould it in to shape, by folding it along the base and side panels. The edges of the strap do have a tendency to curl. To counter this, place pins along the row ends to hold them in place.
Once you are finished placing pins in to the areas you wish to reshape, place a pile of heavy books on top of the bag to apply presure and set the creases along the base and side panels. This step is not essential but is advised. Leave overnight to dry. Once a definite crease has formed you can remove the books and allow the bag to continue drying in the open air.
Once the bag is completely dry, sew a decorative button in place under the pointed end of the strap. You will probably find that the button hole has shrunk considerably, if you wish to make it bigger use the point of a chunky knitting needle to stretch the opening until it is large enough for your choice of button to fit through.
Decorate Bag with your choice of accessory or with the Felted Flowers Corsage